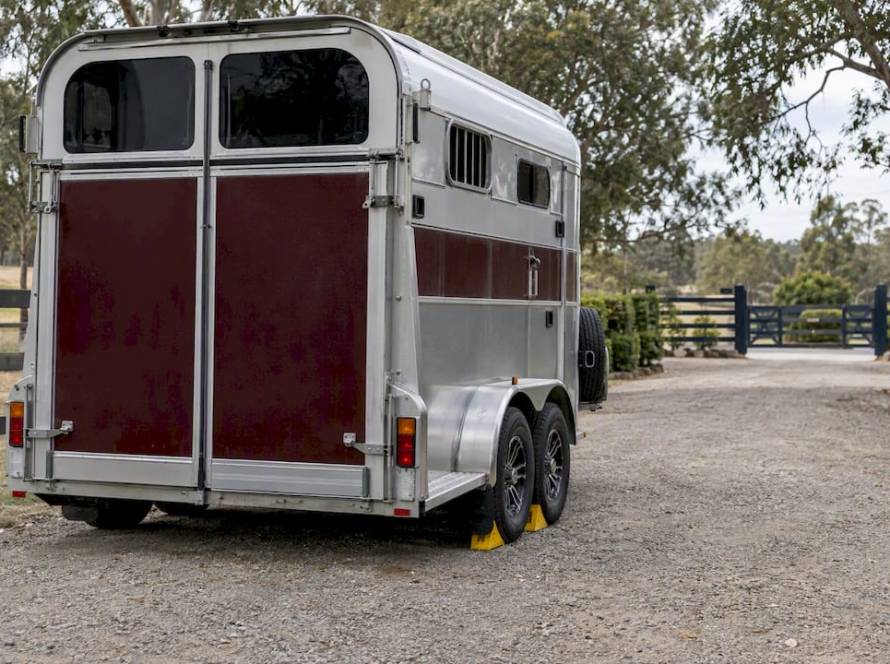
A tail light guard is a shield that sits around or over a float’s rear lamp so that a bump, a loose strap or a reversing mishap hits the guard instead of the lens. A good one protects the lamp without hiding it. The three things that decide whether a guard is a good choice are the material, how well it fits your lamp and mounting points, and whether the lamp stays visible at the angles the Australian rules require. This guide covers all three, plus how to install and check a guard so it keeps doing its job.
Why float tail lights get damaged
A horse float’s rear end takes more knocks than most trailers. You reverse into tight paddock gates and yards, back up to feed sheds and hay stacks, and load and unload on uneven ground. Rear ramps and doors swing and drop near the lamps. Gravel roads throw stones. A lamp that is cracked or loose on the day you leave for a show is a problem you cannot fix on the side of the road.
The lamps matter for more than a tidy float. Other drivers judge your width, speed and braking by your rear lights, and a float is a big, slow object carrying a live animal. Horses and People, an Australian equestrian publication, tells owners to check that all lights work before each trip and that equipment remains properly secured at regular intervals. A guard is one way to make that job easier, because the lamp has less to be damaged by in the first place.
What a tail light guard actually does
Guards are built on one idea: put something tougher than the lens in the way of the impact. Most designs do this in one of two ways.
- Plate or shield guards sit over the lamp and take direct hits from debris or corners. They are usually bolted on through the existing lamp mounting points.
- Cage or bar guards surround the lamp with ribs or a frame, leaving the lens open to view. The idea is a crumple zone that absorbs a low-speed knock and leaves the lamp behind it untouched. Australian-made guards using this approach are marketed for protecting fragile lights at low speeds.
Neither type is a substitute for careful reversing, and neither is designed to survive a serious collision. They are for the everyday knocks that crack lenses and loosen wiring.
Materials: what to look for
The material tells you how the guard will behave after a few years of Australian sun, red dust and wash-downs.
| Material | Strengths | Things to watch |
|---|---|---|
| Aluminium (plate or tread plate) | Light, does not rust, suits a painted or polished float | Can dent or bend under a hard knock; check it is thick enough for your use |
| Steel (heavy gauge) | Very strong, takes repeated impact | Needs a good coating or galvanising so scratches do not rust; heavier |
| Stainless steel | Resists rust, easy to clean after wash-downs | Usually costs more |
| Moulded plastic or rubber | Cheap, forgiving, will not scratch paint | Sun can make it brittle over time |
UV is a real factor here. Float maintenance advice in Australia consistently points to sun exposure as a leading cause of ageing on trailers and floats, so a plastic or rubber guard that sits in full sun on a float parked outdoors deserves a closer look at each service than a metal one does.
Whatever the material, look at the edges. A guard with sharp corners or a rough cut is a hazard to people handling the float and, more importantly, to horses being led around the back. Smooth, rounded edges and flush fasteners are the goal.
Think about the horse as well as the lamp
The rear of a float is where horses are loaded, unloaded and sometimes where a lead rope or headstall swings. Horse float safety guidance has long recommended keeping the back of the float free of anything a horse could catch itself on. Treat that as a rule for any guard you fit:
- No protruding bolt ends or sharp tabs.
- No gaps between the guard and the body that a hoof or leg could slip into.
- No hooks or edges at head or lead-rope height that can snag a rope.
If you cannot get a guard to sit snug and smooth, it is the wrong guard for a horse float, however well it suits a work trailer.
Will it fit? A simple check before you buy
The commonest mistake is buying a guard for a different lamp. Guards are made around particular lamp shapes and mounting patterns, and “universal” often means “close enough to need drilling”. Work through these steps with your float parked on level ground.
- Identify the lamp. Look for the make and model moulded into the lens or stamped on the housing. Note whether it is an incandescent or an LED unit, and whether it is a single lamp or a combined tail, brake and indicator cluster.
- Measure the lamp. Record the width, height and how far it stands proud of the body. Guards with a lip need clearance for it.
- Check the mounting. Many guards are designed to bolt on using the lamp’s existing mounting studs, sitting between the bracket and the lamp. Count the studs and measure the distance between them. Compare the figure to the guard’s listed hole spacing.
- Hold it up. If you can, offer the guard to the lamp before fixing anything. The same dry-fit logic applies when fitting replacement trailer lights: hold the part to the mounting points and see if the holes line up.
- Check the stud length. A guard adds thickness. If the studs are short, the lamp may not be secure once the guard is in place, and you will need longer studs or a different design.
- Check the surroundings. Look at the number plate lamp, reflectors, the ramp or rear door swing, and any bumper or rear step. The guard must not clash with any of them.
If your float’s lights are a custom or European-style fit, take photos and measurements to the supplier rather than guessing. Our horse float lighting guide covers what to fit and how to fit it, which helps when you are matching a guard to a lamp.
Keeping the lamp visible: the Australian rules
This is where guards can go wrong. A guard that protects the lamp but hides its light is worse than no guard, because a covered lamp can make your float non-compliant.
Most horse floats fall under trailers with an aggregate trailer mass of 4.5 tonnes or less. The Department of Infrastructure’s Vehicle Standards Bulletin 1, Revision 6 (September 2024) sets out the lighting these trailers must carry. In summary:
- Two red tail lamps, two red brake lamps and two amber indicator lamps.
- Rear reflectors and a rear registration plate lamp.
- Tail lamps positioned between 350 mm and 1,500 mm high, no more than 400 mm from the trailer’s edge and at least 600 mm apart.
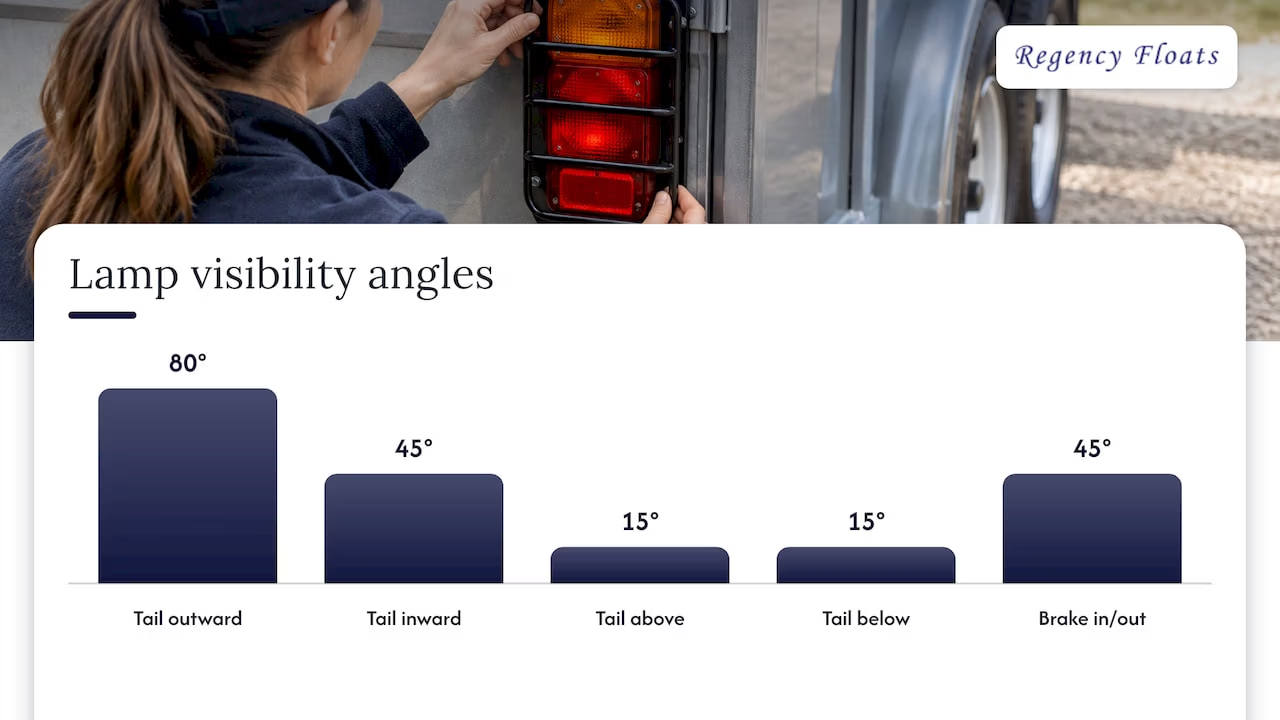
The same bulletin sets visibility angles. Tail lamps must be visible 80 degrees outwards and 45 degrees inwards horizontally, and 15 degrees above and below horizontal. Brake lamps must be visible 45 degrees inwards and 45 degrees outwards horizontally.
Those angles are your test for any guard. A guard that is wide, deep or tall can cut off the sideways view of the lamp even when it looks fine from directly behind. The National Heavy Vehicle Regulator’s guidance on visibility warns that recesses may reduce the visibility of lights or reflectors and cause them to become non-compliant, and a deep guard creates just that kind of recess.
The older National Code of Practice for light trailers makes the same point from the manufacturer’s side: lamps must be fitted as instructed and nothing on the trailer or its equipment should obstruct their output. Treat the guard as part of that equipment.
A practical visibility check
You do not need instruments to catch the obvious problems.
- Park the float, turn the lights on and have a helper switch on the tail, brake and indicator lamps in turn.
- Walk an arc around the back at a distance, from directly behind out to about 80 degrees each side for the tail lamps. Watch for the point where the guard begins to hide the lens.
- Crouch and stand on tiptoe to check the angles above and below the lamp.
- Check that reflectors and the plate lamp are clear of the guard and not partly covered.
If any lamp disappears early, choose a shallower or more open guard, or move to a design that frames the lamp rather than covering it. State rules and inspection requirements can differ, so if you are unsure, ask your state road authority or an authorised inspection station before you tow.
Installing a guard properly
Installation should be straightforward if the guard matches the lamp. A solid installation follows this order.
- Disconnect the float from the tow vehicle so nothing is live while you work on the wiring.
- Remove the lamp and keep the original nuts and washers. Inspect the wiring, connectors and seals while you have it off.
- Clean the mounting surface. Remove old sealant, rust and road grime so the lamp sits flat.
- Fit the guard over the studs or mounting points as the maker intends, then refit the lamp. Tighten evenly so the guard and lamp do not rock.
- Use lock nuts or thread-locking washers on fasteners. Corrugation and highway vibration loosen ordinary nuts over time.
- Reconnect and test every lamp function with the tow vehicle connected, then run the visibility walk-around described above.
If a guard needs drilling, welding or cutting into the body, have it done by someone who works on floats, particularly on aluminium or fibreglass bodies where poor fixing can cause cracks or leaks.
Inspect and maintain: a routine that takes five minutes
A guard hides part of the lamp from view, so problems can hide too. Build it into your routine before every trip, alongside the rest of the float. Our horse float pre-trip checklist is a good base for it.
Horses and People advises owners that before each trip they should check that all lights work, that the safety chains are properly connected and that the vehicle and float are roadworthy. Greg Grant Saddlery likewise recommends an electrical check of lights, blinkers and brakes before you float. Add these guard-specific points:
- Fasteners: Press the guard. Any movement means a loose nut or a worn stud.
- Cracks and bends: Look for cracks at the mounting holes and any bend that pushes the guard toward the lens.
- Lens and seals: Check for condensation inside the lamp, which suggests a failing seal. Guards can trap moisture and mud around the lamp.
- Corrosion: Where steel meets aluminium, look for white powdery corrosion or rust streaks. Touch up damaged coatings early.
- Dirt: Wash mud and dust off the lens and guard. A dirty lens loses brightness, and a guard clogged with mud can block light.
- Wiring: Check connectors and the plug at the tow vehicle end. A guard does nothing for a bad earth.
After any scrape or reverse bump, stop and look. A guard that has taken a hit may have shifted or bent, and it is easier to fix then than at the next roadside check.
Choosing a guard for the way you use your float
There is no single best guard. Match it to your habits.
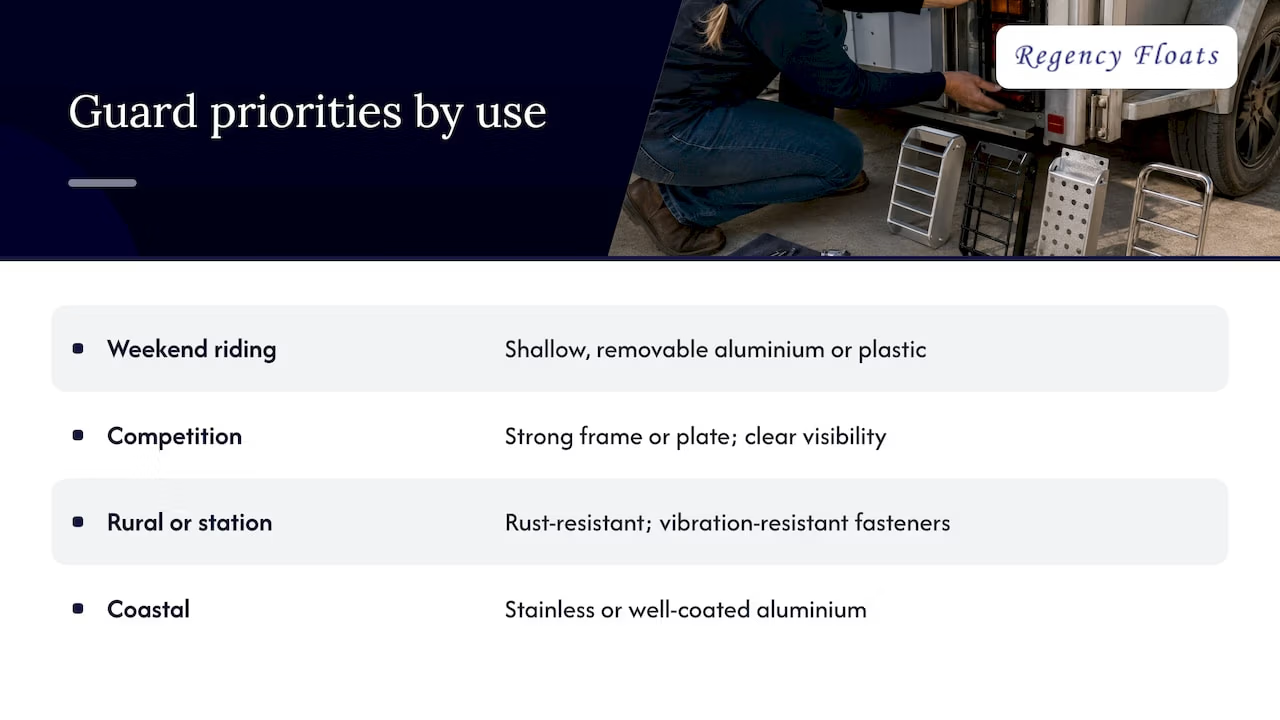
Weekend trail and pleasure riders who tow on sealed roads and park in a yard can usually get by with a moderate aluminium or plastic guard that is shallow and easy to remove for cleaning.
Competition riders who cover long distances, stay at crowded grounds and reverse into tight spaces benefit from a stronger frame or heavy-duty plate, provided it clears the visibility angles.
Rural and station owners who run gravel roads and creek crossings want something tough and rust-resistant, such as coated steel or stainless, with fasteners that resist vibration.
Coastal owners should favour stainless or well-coated aluminium, since salt air attacks bare steel quickly.
In every case, buy a guard sized for your lamp, check that it keeps the lamp visible at the required angles, and confirm that nothing on it can snag a horse or a rope.
Starting with the float itself
Guards are an add-on. The most reliable way to get protected rear lights is to begin with a float built with sensible lighting placement, a strong rear structure and a layout that suits how you travel. At Regency Floats we build horse floats designed around safety, with over 40 years of manufacturing experience, and we customise colours, fittings and floor plans to suit your needs.
If you are comparing floats, browse our full float range, from standard and deluxe floats to gooseneck, camper and Thoroughbred series models, or look at the 2 horse float range if you are after a compact option. Our horse float accessories list and parts guide are good places to see what else is worth fitting and what to check as the float ages.

We supply new and pre-owned floats, with delivery available Australia-wide. Visit Regency Floats to see current in-stock specials, or talk to us about the float, fittings and accessories that suit how you travel.
Know your towing limits too
Protected lights are only one part of towing legally. The float and the tow vehicle also have to be matched. Our guide to towing capacity for horse floats explains how to work out what your vehicle can legally tow, and the tow vehicle must have the correct electrical socket so the float’s lights can operate. Both are worth sorting out before you spend money on guards or other extras.
FAQ
Are tail light guards legal on a horse float in Australia?
There is no blanket ban, but the lamps must still meet the lighting rules once a guard is fitted. Vehicle Standards Bulletin 1 requires tail lamps to be visible at set angles, and equipment on the trailer must not obstruct lamp output. If a guard cuts off the sideways or vertical view of a lamp, it is a problem. Check with your state road authority if you are unsure.
Can I fit a guard myself?
If the guard is designed to bolt on through your lamp’s existing studs, many owners can fit it with basic hand tools. Disconnect the float, dry-fit first, use lock nuts and test every lamp function afterwards. If it needs drilling, welding or cutting into the body, ask a float repairer to do it so the structure and wiring are not damaged.
How do I know a guard will fit my lamps?
Identify the lamp model, measure its width, height and stud spacing, then compare these to the guard’s listed dimensions. Hold the guard to the mounting points before fixing anything, and check that the studs are long enough for the extra thickness. If you are not sure, take photos and measurements to the supplier.
How often should I check the guard and lights?
Check every time you tow, as part of your pre-trip routine: test every lamp with the tow vehicle connected, press the guard to check it is secure and look for cracks, corrosion or moisture in the lens. Do a closer inspection after any knock or reversing scrape.
Which material is best for a horse float guard?
It depends on use. Coated steel suits heavy use, while stainless steel or aluminium suits wet, coastal conditions. Plastic or rubber is light and kind to paintwork, but check it more often for sun damage. Whatever you pick, make sure it is smooth-edged and leaves the lamp visible.