A hydraulic ramp on a horse float uses a small electric pump and one or two cylinders to raise and lower the rear ramp, so you are not lifting a heavy tailgate by hand. Done well, it is smooth, controlled and quiet. It is also a moving mechanism that carries a load over a horse’s loading zone, so it needs good design, regular checks and sensible habits. This guide covers how the system works, what to check every time, whether a kit can be fitted to an existing float, what it costs to maintain, and how ramp design affects the way a horse walks in and out.
How a hydraulic float ramp works
The system has four basic parts: a power pack, one or more hydraulic cylinders, hoses with valves, and a control. The power pack is a 12 or 24 volt electric motor driving a pump and an oil tank. You press a button on a handpiece or pendant, the pump pushes oil into the cylinders, and the ramp lifts. When you lower it, oil returns to the tank in a controlled way.
To see what a typical kit contains, look at the specifications Australian suppliers publish. One hydraulic tail ramp kit package lists a power unit with a 1.6 kW motor (single acting) or 2.2 kW (double acting), two 2.5-inch bore cylinders, hose burst valves, a 10 litre oil tank and a two-button pendant with a 3 m cable. Another Australian ramp kit includes a flow control valve that lets you adjust how fast the ramp lowers, plus hose burst valves that stop the ramp dropping quickly if a hose fails.
Those two valves matter most to a horse owner:
- Flow control sets the lowering speed, so the ramp settles gently instead of dropping.
- Hose burst valves are a safeguard against sudden loss of pressure.
The same supplier notes the ramp is hydraulically locked in position, which is why a firm, level footing under the ramp matters when it is down.
Single acting or double acting
A single acting setup pushes the ramp up with hydraulic pressure and lets the ramp’s weight bring it down through a controlled valve. A double acting setup uses pressure in both directions. Which one suits a float depends on the ramp weight, the geometry and the manufacturer’s design, so it is a question for the people who build or fit the system rather than something to guess at.
The ramp must float when it is down
A UK supplier of hydraulic systems for horse transport points out that the ramp must float in the down position so the vehicle body can move up and down as horses load and the suspension works. If the ramp were held rigidly, the weight of a horse stepping on could stress the cylinders and fittings. The same source says the ramp must be kept locked up in transit and, when powered down, lowered under control.
Why float ramps are so heavy
Most Australian floats use a rear ramp that you walk the horse up. Trainer Ross Jacobs notes that in Australia we almost exclusively use ramps to walk a horse into a trailer. A full-width ramp with a non-slip surface and a solid frame is heavy, and rubber matting adds to it. The UK supplier above says these ramps tend to be very heavy, particularly with modern rubber matting.
Many standard float ramps are balanced with springs, which does a lot of the lifting. A hydraulic ramp is a step beyond that, and it is most useful on larger, heavier ramps, on horse trucks, and for owners who struggle with a heavy lift. Workplace safety guidance in Victoria treats heavy ramps seriously. It says ramps needing a hydraulic or mechanical raising and lowering device should have failsafe design features so they do not fall in an uncontrolled manner if the hydraulics or mechanism fail. It also lists steeply pitched, poorly designed or poorly maintained ramps as a practice to avoid, because of the manual handling and slip risks.
That guidance is written for workplaces, but the principle holds for a family float in the driveway: a heavy ramp should either be easy to handle or fail safely.
Safety checks before you operate the ramp
A short routine before every trip catches most problems. Build it into your pre-departure checklist.
- Look at the ramp surface. Check the flooring or matting for damage, upturned rubber and rust, and that the footing is sound. This follows a pre-departure float checklist from an Australian equine health company.
- Check springs and latches. An Australian horse marketplace’s maintenance guide advises inspecting the ramp springs for mobility, looking at the latches for rust or wear, and lubricating the latches so they move easily.
- Run the whole assembly once, empty. A float buyer’s checklist advises confirming that the complete ramp assembly operates as intended, and operating it without placing yourself underneath, where a faulty ramp, spring or latch could cause injury.
- Check the ground. Park on firm, level ground. The kit supplier cited earlier warns that if a ramp sinks or is not supported firmly, ram rods can bend. Our guide to parking a horse float covers safe spots and setup.
- Latch it once loaded. After loading, confirm the ramp is latched correctly and securely before you drive off.
Where you stand
Stand to the side. One Australian float safety guide says the handler should never stand behind the tailgate when it is lifted or lowered, and should stand to the side with toes clear of the edge. Nobody, including children, should be under or behind the ramp while it moves.
Never lower it with the horse tied
The same guide says the tailgate should never be lowered while the horse is still tied in the float. Agriculture Victoria’s advice for arrival matches it: quietly enter the vehicle, untie the horse before lowering the ramp, and let the horse move out at its own pace. If you use a rear bar, our page on butt bars on a horse float explains fit, height and safe use.
Can you fit a hydraulic ramp to an existing float?
Often a kit can be added, but compatibility depends on the ramp’s weight, its hinge geometry, the available mounting points for the cylinders, and the electrical supply from the tow vehicle or float battery. Treat it as an engineering job, not a bolt-on accessory. The UK supplier says it is crucial that hydraulics are installed correctly, because mistakes by inexperienced people can cost a large sum to put right.
What kits cost
Australian kit prices vary with what is included. An Australian supplier lists horse truck ramp and tail gate kits from $1000. A standard kit includes a single acting power unit, cylinder, hose and fittings, a two-button handpiece, a user guide and a concept drawing to help with installation, in 12V or 24V. Another supplier lists its full package at AU$2,817.78 at the time of writing. Prices change, so confirm on the supplier’s page, and allow for installation labour and any welding or bracketry on top of the kit.
Questions to settle before you buy a kit
- What does the ramp weigh with matting fitted, and what are the cylinder’s push rating and stroke?
- Is your electrical supply 12V or 24V, and can it handle the current?
- Where will the cylinders mount, and will the ramp still float when down?
- Is there a manual way to raise or lower the ramp if power is lost?
- Who will install it, and will they sign off on the work?
If you are choosing a float rather than modifying one, it is simpler to decide on the ramp type up front and buy a float built around it.
Looking after a hydraulic ramp
Hydraulic systems are reliable when they are used as designed and checked regularly. The routine is short.
Servicing and fluid
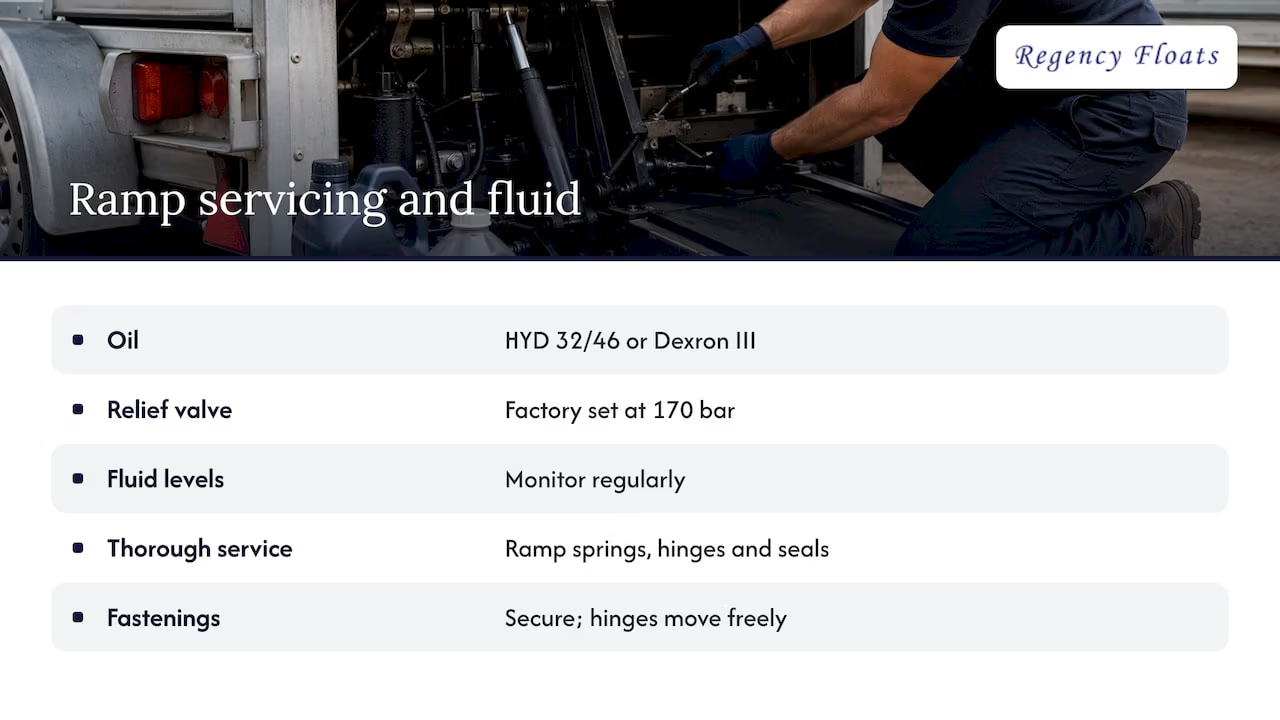
The UK supplier recommends putting servicing on your checklist: the ramp should operate smoothly and fluid levels should be monitored regularly. The Australian kit specifications give the oil type for one pack: HYD 32 or HYD 46 oil, or Dexron III automatic transmission fluid, with the relief valve factory set at 170 bar. Always use whatever your own kit’s manual specifies.
For floats used regularly, an Australia and New Zealand safety guide advises a thorough service by a trailer specialist that includes ramp springs, hinges and seals. Check that fastenings are secure and the hinges move freely.
Respect the duty cycle
DC hydraulic power packs draw high current and make a lot of heat, and the supplier states they are designed only for intermittent use. Its published duty cycles run from 25% at low duty (12.5 minutes of run time) down to 7% at high duty (1.7 minutes). In practice, raise and lower the ramp, then let the pack rest. Do not cycle it repeatedly to make a point to a nervous horse.
Hoses and fittings
Hoses age, rub and weep. Look along each hose for abrasion, bulges and oil residue, and check the fittings at both ends. Any hose replacement should be done with the system depressurised and the ramp supported, not with the ramp raised on its own pressure. A guide to hydraulic hose replacement steps covers the lockout, zero pressure and testing sequence that applies to hydraulic work generally. For a float ramp, have a qualified hydraulics or trailer technician do the job.
For the rest of the ramp’s moving parts, our horse float parts guide explains what to check and repair.
What if the power fails?
Plan for it before it happens. The UK supplier says a design should consider power loss and a manual means of achieving simple operations. Know where the manual release or bypass is on your system, and keep the manual in the tow vehicle. A flat float battery is the most common reason a ramp will not move, so check the battery before a long trip. If a horse is inside and the ramp will not lower, keep calm, keep the horse tied and settled, and call a trailer technician or roadside service rather than forcing anything.
Ramp design and calm loading
The hydraulics only deal with lifting. What the horse feels is the surface, the angle and the noise.
Surface and angle
Agriculture Victoria states that float flooring and loading ramps should have a non-slippery surface, fitted with foot battens if necessary, and that internal surfaces should be smooth and free of hazards. Ross Jacobs recommends non-slip flooring and a shallow ramp angle, noting that some ramps are so steep they might as well be a step-up trailer, and that surfaces that are slippery when wet can make a horse lose confidence.
An Australian float safety guide goes further on surfaces: it says rubber matting with raised nodules is the only truly non-slip ramp the author knows of, and that assisting springs should be adjusted so the front edge of the ramp lies flat on the ground when down, avoiding uncertainty for the horse. A ramp that rocks or hovers as the horse steps on it teaches the horse to distrust it.

Smooth and quiet
Horses startle easily, and the UK supplier makes the point that any moving hydraulic parts should be smooth and as quiet as possible so as not to scare the horse. Practically, that means:
- Operate the ramp with the horse away from the float, so the first time it hears the pump is not when it is being asked to walk in.
- Introduce the sound gradually to young or green horses.
- Use the flow control to keep lowering gentle, if your system has one.
Calm routines
Load and unload the same way every time. Untie before the ramp comes down, stand beside the ramp, and let the horse back out at its own pace. Nervous horses also benefit from good leg protection, and our leg protection checklist shows what to fit before you go.
Hydraulic ramp or standard ramp: which suits you?
| Situation | What tends to suit |
|---|---|
| Light ramp with working springs, one handler comfortable lifting it | Standard sprung ramp, kept well maintained |
| Heavy ramp, horse truck, or a handler who cannot lift safely | Hydraulic or other powered assistance |
| Frequent use at several stops a day | Powered system sized for the duty cycle, or a sprung ramp |
| Float stored in remote areas, little access to technicians | Sprung ramp, or a hydraulic system with a clear manual override |
The right answer depends on the ramp’s weight and design, how often you load, and who will operate it. A well-designed sprung ramp is a good solution for many owners, and a hydraulic system makes sense where the weight justifies it.
Choosing a float built around safe loading
When you shop for a float, look at the ramp as closely as the body. Check the surface, the angle, how the ramp feels to lift and lower, and what the flooring underneath is made of.
Regency Floats has been building horse floats in Australia for over 40 years. Our floats are designed with advanced safety technology and European luxury design, and our flooring system is backed by a ten-year warranty. You can choose colours and fittings to suit you, and the range covers Standard, Deluxe, Camper, Gooseneck, Straight Load and Thoroughbred Series floats, as well as 2 horse models.

Browse the full Regency Floats range or the 2 horse float range, then talk to our team about the loading setup that suits your horses and how you travel. If you are building up your kit, our horse float accessories list is a good next stop.
FAQ
Does a hydraulic ramp make a horse float safer?
It can make the ramp easier and more controlled to handle, which reduces the manual lifting risk. Safety still depends on the design having failsafe features, a non-slip surface, a shallow angle and regular servicing. Always stand to the side while the ramp moves.
How much does a hydraulic ramp kit cost in Australia?
Published Australian kit prices start from $1000 for a standard kit and reach AU$2,817.78 for a fuller package at the time of writing. Installation is extra, and prices change, so check each supplier’s page.
What happens if the hydraulics fail?
A well-designed system has hose burst valves and a way to operate the ramp manually. Know where yours is before you travel. If the ramp will not move with a horse inside, keep the horse tied and calm and call a trailer technician.
How often should a hydraulic ramp be serviced?
Check fluid, hoses, springs, hinges and latches regularly, and for floats used often, book a thorough service with a trailer specialist. Follow the interval in your kit’s manual, as it varies by system.